| Newsletter - 2014 Archive |
|
Cycling Club |
 |
| Newsletter - 2014 Archive |
|
Cycling Club |
|
Next--->
|
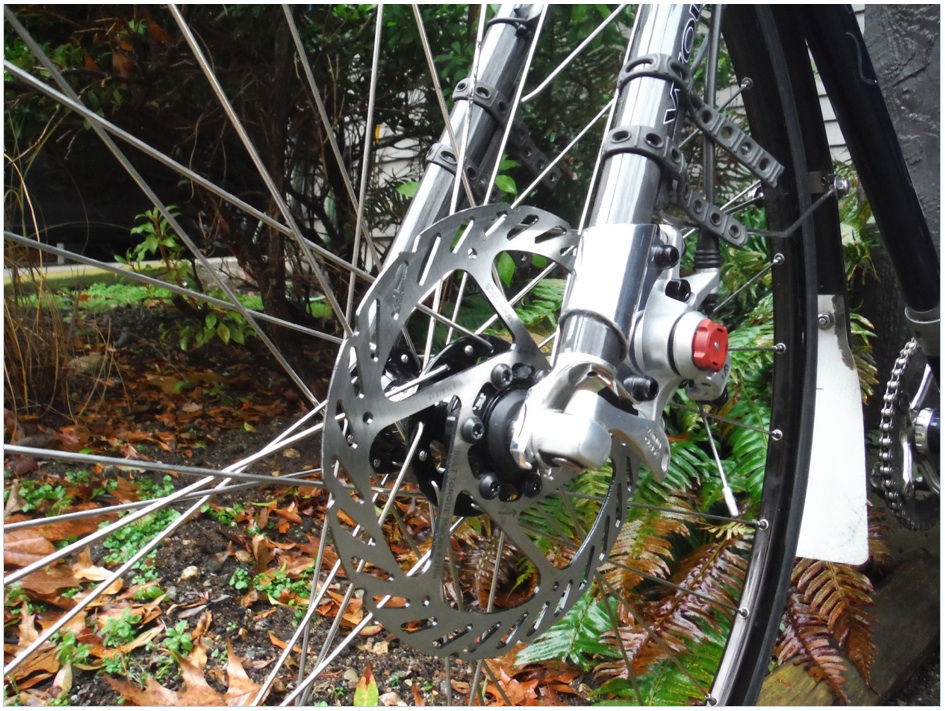
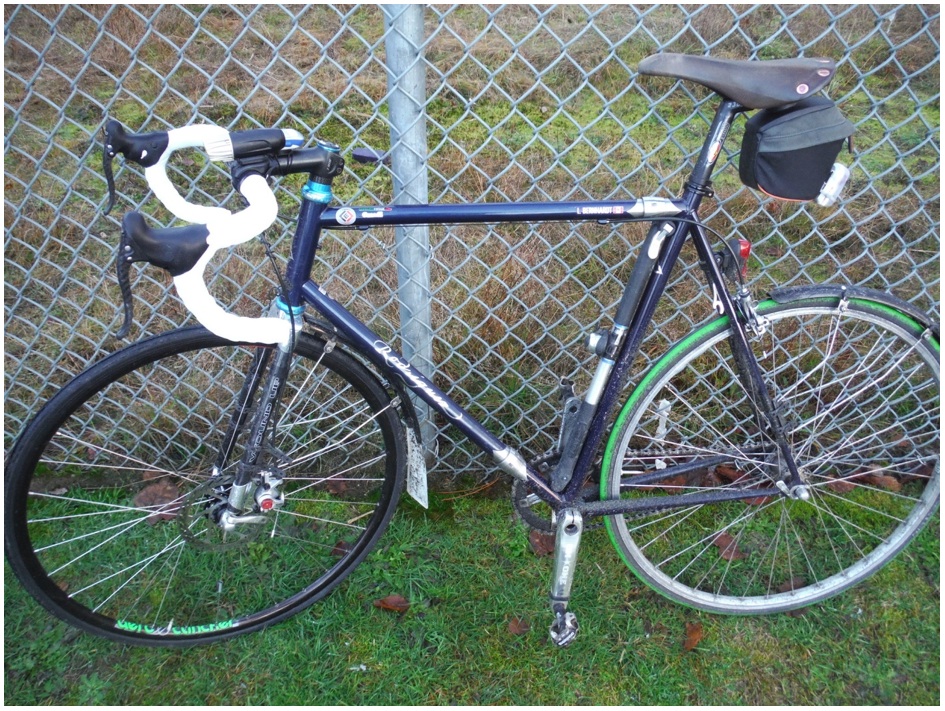
Experimenting with a Front Disc Brake Disc brakes are pretty standard now on mtb's, but for the road they seem to be a solution looking for a problem. They provide much better modulation, but mechanical disks don't provide as much maximum power, and they are heavier than caliper brakes when you factor in that heavy steel rotor. They are a good excuse for using carbon fiber rims, but the major advantage is in saving the front rim in wet and dirty winter riding. I have been experimenting with a front disc brake this past winter, and I am impressed with its capabilities. I would recommend a front disc for winter riding on the road, but would also conclude that a rear disc is unnecessary and superfluous, unless you are set on using carbon fiber wheels front and rear.
The benefits, after 4,000 km of winter riding in the Pacific NW (and some riding in California):
- The front rim is absolutely pristine. In previous years, the front rim would be worn down enough to form longitudinal cracks, or even fail when the tire bead would bend the rim from 100+ psi of tire pressure, allowing the tube to expand and explode. This could be a safety issue. Typically, a rim would last 15-20,000 km before this would happen, but lately I have noticed current rims have started to "bow" outward after only 7,000 km. This suggests that the rim manufacturers are using less material. For the past several years, I've been using a Rodriguez fixed gear bike almost exclusively on the road. The typical summer configuration uses an ENVE carbon fiber fork with Campag Chorus caliper brakes front and rear. In the winter, I typically change out the handlebar/stem and attached brake assembly to Campag Centaur and vintage Record. This past winter, I wanted to experiment with a front disc in order to address the front rim wear problem. The first issue was obtaining a proper disc brake fork. Most authorities are adamant that a fork must be built to specifically handle the loads of a disc brake. They show pictures of broken forks that are bent just above the disc mount. Another issue is that the force of a disc brake tends to move the wheel downward in the dropout. One hears stories of disc brakes causing wheels to eject from forks. Finally (after years) this justifies the use of "lawyer tabs," which I have always filed off on all my forks so that I don't have to mess with the quick release to get the front wheel on or off.
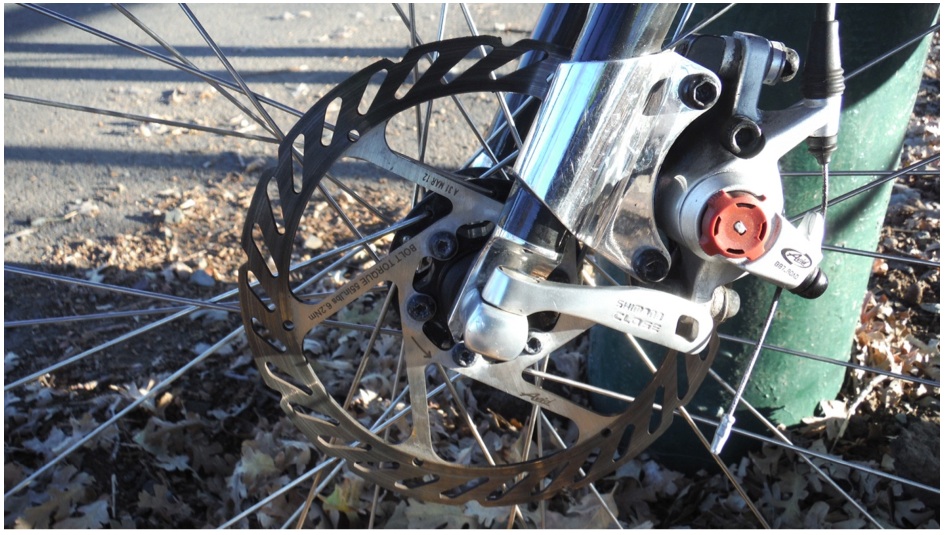
The second issue was finding a fork built to handle a disc that had a 367mm axle-crown measurement. This is pretty standard for a road fork, but most aftermarket forks are built for touring or cyclocross, with axle-crown distances of 380 to 400mm. You would think that product managers would make 367mm disc forks readily available for riders wanting to upgrade their road bikes for front disc/rear caliper use. Especially when used with a hydraulic disc, this setup would allay fears of losing brakes entirely if the hydraulic fluid overheats and causes the brake to fade on a long, steep descent; at least you'd still have the rear caliper brake. But no, the only production 367mm disc fork is made by ENVE for a tapered (1 1/8" to 1.5") steerer. Most disc forks are built for cyclocross use and provide plenty of clearance, but they also raise the front of the bike slightly (and mess with the resulting rake/trail). Fortunately, I was able to order a Wound Up carbon disc brake fork, modified with a 367mm axle-crown distance, and with a 45mm rake. The Wound Up disc fork appears to be their standard fork with the attachment of a standard disk brake sleeve (which says a lot about the strength of their standard fork. Wound Up, by the way, is about the only company to make a carbon fiber tandem-certified fork). The fork is ugly as sin, the aluminum crown is still massive and provides just enough clearance to a 23mm tire, and the carbon steerer is reinforced with an aluminum liner so that a standard starfangled nut can be used, but the result is a 650 gram fork (compared to the 350-gram ENVE 2.0. At least, like ENVE, the Wound Up forks are built in Utah, and are not from some unnamed factory in China! The other preparation required was building a new front wheel. I used the SRAM 506 front disc hub as the basis. Since I like to have the outward spokes radiating backwards (with the rotation), I had to build the wheel asymmetrically. The theory is that you want the outward spokes radiating against the forces being exerted next to the spoke flange ("wind-up"), so the drive side of the rear wheel will have the spokes radiating back. Because the rotor is on the left side, the outward spokes must radiate towards the front (against the rotation); thus, the asymmetrical front wheel, which must also be dished. 32 spokes are sufficient; I'm not sure disc hubs with less than 32 holes are commonly available. I typically build my front wheels (for caliper brakes) with 28 spokes (I weigh 170 pounds/78 kilos). Because there is so little stress on the front rim, I have resolved to build a second front disc wheel, but it will have a carbon fiber clincher rim! I was able to obtain compressionless cable housing (highly recommended), and installation of the disc was quick and easy. After mounting the rotor to the hub with the six torx bolts, you install the front wheel in the fork, then LOOSELY attach the disc caliper unit, tighten down the pads against the rotor, and tighten the caliper unit to the fork. This ensures that the pads are properly aligned to the rotor. You then attach the brake cable and adjust the pads so the wheel spins freely, but lever travel is minimal. I didn’t even bother to attach the cable adjuster – its sole purpose is to take out any cable stretching. The instructions are adamant about not using it to adjust the lever travel (other than taking out the initial unproductive part). The lever is a standard Campag carbon fiber with the gearshift internals removed. Lever travel is equivalent to a well-adjusted rim caliper. You then have to seat/wear in the disc pads. This is done by taking the bike down a steep hill and riding the brake for about 10 seconds. My first ride with the disc brake took me down Thermal in Coquitlam in the rain, which requires far more than 10 seconds of braking. I rode only the front brake most of the way down with no problem. At the last stop sign, I put my gloved hand on the rotor, which immediately started smoking! The rotor does get hot! Later in December, when I took the bike to California and rode up and down Mt. Diablo, the rotor had changed to a darker color by the bottom of the descent!
Since I installed the disc brake, with very few exceptions all of my braking has been front brake only. This was initially to test the efficiency of the brake, but I was so confident with the result that I just continued to use front brake only. Yes, you do need to revert to rear brake only on icy roads, but on soft snow, I've even had the confidence to apply just the front brake due to the disc's superior modulation. I think the greater modulation is due to the mechanical disadvantage of the disk vs a rim brake. On a standard caliper rim brake, the calipers are located at pretty much the same part of the circle where resistance (ground force on tire) is applied, so the forces tend to cancel each other out, and it is easy to apply too much force to the brake, which causes traction to be lost. With a disc, though, the braking force is applied closer to the center of the wheel circle, and the resistance of the ground is multiplied by the greater distance (moment arm) of the hub to rim distance vs the hub to rotor distance. But because braking force is reduced due to this difference in leverage, it is easier to make small changes to the braking force without significantly disrupting the tire traction. The loss of leverage makes the brakes less "twitchy," enhancing the ability to modulate braking. I think the advantage of a hydraulic brake has more to do with the ability to apply greater forces at maximum braking, since there is some leverage provided by the hydraulic reservoir. I think this would provide more uniform modulation across the entire lever travel, including at the maximum extreme, where the mechanical disc's inferior leverage requires more hand pulling force. But we will find out when I upgrade to a hydraulic disc for next winter. And if the front disc is good, wouldn't adding a rear disc be better? For the road, I think not, and for the following reasons:
- The weight penalty of a disc brake and rotor vs brake caliper. March 2, 2014 |